The Ultimate Guide to Radial Chip Thinning
Have you ever tried to “baby” an expensive carbide end mill by reducing your step-over (RDOC), only to hear the spindle scream? You check the tool, and it is burned out or chipped prematurely.
It feels counter-intuitive. You reduced the load, so why did the tool fail?
The answer lies in a phenomenon called radial chip thinning. If you don’t understand it, you might be unintentionally “murdering” your tools with the wrong parameters. This isn’t just about efficiency—it is about tool survival.
In this guide, we will reveal the physics behind the phenomenon, the logic of the radial chip thinning formula, and how to use modern CAM strategies to revolutionize your machining process.
The Big Misconception: Programmed Feed vs. Actual Chip Thickness
Most machinists maintain a mental model where Programmed Feed Rate (fz or IPT) equals Chip Thickness.
- This is TRUE: When your Radial Depth of Cut (RDOC / ae) is 50% of the tool diameter or more.
- This is FALSE: When you take light finishing cuts or use High Efficiency Milling (HEM) paths.
The “Salami Slice” Analogy
Imagine slicing a salami.
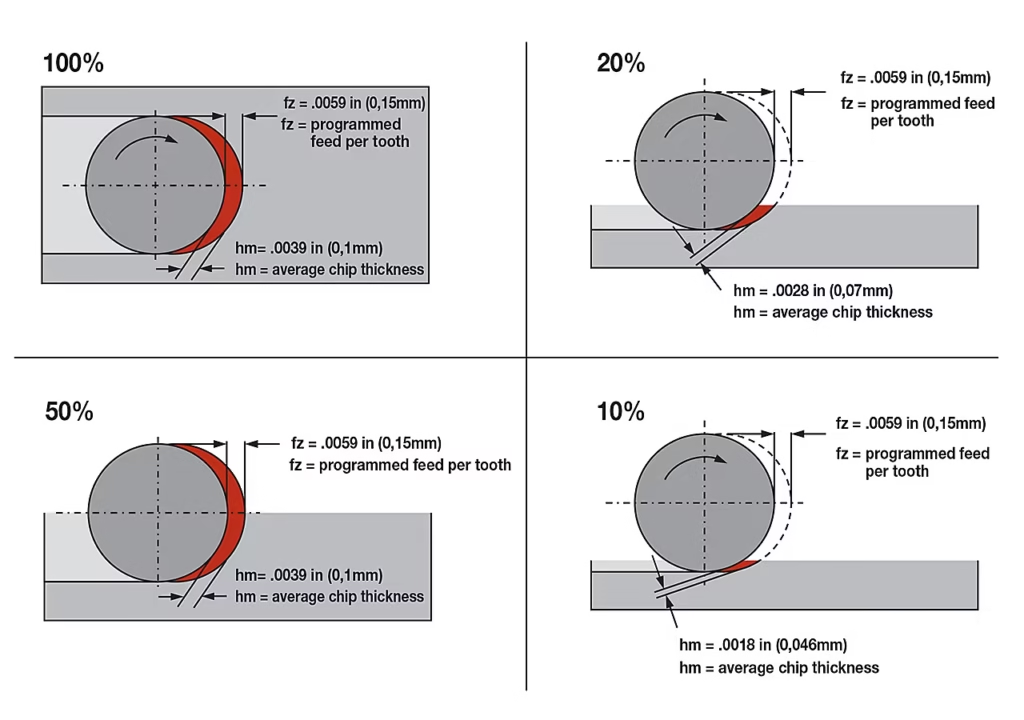
- The Center Cut: If you cut straight down the middle (50% engagement), the thickness of the slice equals the distance the knife moved.
- The Edge Cut: If you only graze the very edge of the salami (10% engagement) and move the knife the same distance, the resulting slice is extremely thin and comma-shaped.
This is radial chip thinning. When your step-over drops below 50% of the cutter diameter, the physical chip becomes significantly thinner than your programmed feed rate.

Why “Too Thin” is Fatal (The Science of Rubbing)
You might ask, “Isn’t a thinner chip easier on the tool?”
No. In fact, too thin is dangerous. Carbide cutting edges are not infinitely sharp. They have a microscopic Honing Radius (or edge prep), typically between 0.01mm and 0.05mm.
Here is the critical rule: You must cut deeper than the honing radius.
- The Cutting Zone: When the chip thickness is larger than the honing radius, the tool shears the metal cleanly. Heat is ejected with the chip.
- The Rubbing Zone: When the radial chip thinning effect reduces the thickness below the honing radius, the tool stops cutting. Instead, it plows, rubs, and burnishes the material.
The Consequences:
- Heat Generation: Friction generates massive heat that stays in the tool instead of leaving with the chip.
- Work Hardening: In materials like Stainless Steel or Titanium, rubbing instantly hardens the surface, causing the next flute to chip upon impact.
- Premature Wear: The flank of the tool wears down rapidly.
Real-World Scenario: The Shoulder Milling Trap
The most common application where machinists fall victim to this phenomenon is during Shoulder Milling.
You might wonder: Why does my end mill sound smooth during the heavy roughing pass, but screams during the light finishing pass on the wall?
The answer lies in the drastic change in chip thickness:
- During Roughing: You typically use a high radial depth of cut (>50%). The chips are thick, and heat is evacuated efficiently.
- During Finishing: You are taking a very light cut (often <2% of the diameter). Here, radial chip thinning kicks in aggressively. If you use the same feed rate for finishing that you used for roughing (or worse, slow it down for “surface finish”), you are essentially rubbing the wall rather than cutting it.
To get a mirror finish on a shoulder wall, you must compensate for thinning by increasing your feed rate significantly.
For a deeper dive into process strategies for square shoulder operations (including step-down vs. step-over techniques), read our full guide on Shoulder Milling.

Image from Widia.
The Math: Radial Chip Thinning Formula & Manual Factors
For engineers who want to understand the math, we calculate the actual thickness using the radial chip thinning formula.
Actual Thickness = Programmed Feed (fz) *radial chip thinning factor.
You can also use our calculator to calculate the Fz.
While you don’t need to manually solve the formula for every cut, you can use this radial chip thinning factor cheat sheet to manually adjust your feed rates:
| Step-Over (ae) % of Diameter | Radial Chip Thinning Factor (Reduction) | Multiply Feed Rate By… |
| 50% | 1.0 (No reduction) | 1.0 (No Change) |
| 30% | ~0.91 | 1.1x |
| 10% | ~0.60 | 1.6x |
| 5% | ~0.43 | 2.3x |
| 2% | ~0.28 | 3.6x |
| 1% | ~0.20 | 5.0x |
Example: If your standard data suggests 1000 mm/min, but you are doing a 2% light finishing pass, you need to program 3600 mm/min to get the tool to actually bite into the material!
Say Goodbye to Calculators: How Modern CAM Strategies “Tame” Chip Thinning
In a production environment, especially with complex 3D surfaces, manually checking a table and modifying every line of G-code is impossible. This is where modern CAM strategies shine.
Modern CAM software (like Mastercam, Fusion 360, or UG NX) is no longer just a path generator; it is a physics simulator that perfectly applies the principles of radial chip thinning.
1. Traditional vs. Dynamic Toolpaths
- Traditional Offsets: These paths simply offset the geometry. In corners, the Tool Engagement Angle (TEA) spikes to 180 degrees (full slotting). To prevent tool breakage, programmers must limit the feed rate based on this “worst-case scenario,” causing the tool to rub and lose efficiency on straightaways.
- Dynamic Toolpaths (HEM): The core algorithm cares about one thing: maintaining a constant Tool Engagement Angle. It dynamically adjusts the step-over and uses trochoidal motion to ensure the tool never overloads.
2. The Three Pillars of Modern CAM
Modern strategies achieve “High Feed, Low Step-over, Long Life” using three specific mechanisms:
- Feed Rate Optimization: This is the “Brain.” The software uses the radial chip thinning formula in real-time. When the cut is light (straight lines), it automatically increases the feed rate by 3x to 5x. When the tool enters a corner, it slows down. This keeps the spindle load meter perfectly constant.
- Trochoidal / Peel Milling: This is the “Dance.” The tool moves in circular or spiral motions, “peeling” the material away in layers. It maintains a constant, light radial engagement (typically 10-20%), preventing shock loads.
- Micro-Lifts: This is the “Cooling Trick.” When the tool retracts to reposition for the next cut, the software lifts the tool slightly (e.g., 0.2mm) off the floor and moves at rapid speed. This prevents the bottom of the tool from rubbing against the finished floor, significantly reducing heat buildup in heat-sensitive materials.
3. The CAM Strategy Dictionary
Different software vendors use different names, but the physics are identical:
| Software | Strategy Name |
| Mastercam | Dynamic Motion |
| Fusion 360 / HSM | Adaptive Clearing |
| SolidCAM | iMachining |
| Siemens NX | Adaptive Milling |
| VoluMill | VoluMill (Plugin) |
Pro Tip: When setting these up, set your Step-over to 7% – 20% of the cutter diameter, and use the full depth of cut (2xD or 3xD). Trust the “insane” feed rates the software calculates—it’s science, not a glitch.
Material Specific Strategies
Now that you have the tools and the theory, here is how to apply them to specific materials:
1. Aluminum (The Speed Strategy)
Aluminum has low work-hardening tendencies. Use radial chip thinning to your absolute advantage. Crank the feed rates to the machine’s maximum limits. Here, thinning helps you achieve massive Material Removal Rates (MRR) by evacuating chips effortlessly.
2. Stainless Steel & Titanium (The Survival Strategy)
Here, the goal is heat management.
- Avoid chips that are too thin to prevent work hardening.
- Ensure every tooth takes a “thick” enough bite to penetrate the hard outer skin of the material.
- If you hear a high-pitched scream, increase the feed rate. It is often more effective than slowing down the RPM.
Summary: Don’t Fear the Feed
Understanding radial chip thinning distinguishes a button-pusher from a master machinist.
- Light cuts ≠Easy on the tool. Too light leads to rubbing.
- Use the Tools: Use the radial chip thinning factor table for manual corrections, or fully embrace modern Dynamic/Adaptive CAM strategies.
- Trust the Math: When your step-over is small, aggressively increase your feed rate. You aren’t just going faster; you are restoring the proper chip thickness to save your tool life.


